
DIY Clothespin Art Display

The new school year is full steam ahead, which in many of our homes means that a fresh stream of our children’s art projects, coloring pages, schoolwork and milestone photos is already on the way. While it’s a given for school-aged children and older ones alike, even my little preschool-aged son is bringing home something special at least once a week that he is so proud to share with Mommy, Daddy and the grandparents!
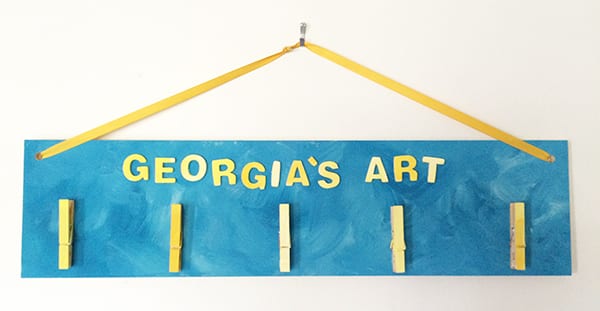
Here is a really fun project that you can work together with your kids to create that offers a special place for displaying (and then easily switching out) your child’s favorite masterpieces. It’s also a great gift idea for grandparents – add a few extra clothespins and have some of your favorite Instagram snapshots printed for a handmade brag board that Grandma will be thrilled to hang in her kitchen!
What you need:
- A thin rectangular piece of unfinished wood (you can purchase these pre-cut from the craft store; we used a 1/4” x 6” x 24” piece of basswood from Hobby Lobby)
- Small unfinished wooden letters
- 5 wooden clothespins
- Craft paint, in at least two contrasting colors (we used 3 shades of blue and 3 shades of yellow)
- Paint brush
- Strong white craft glue (such as Elmer’s Craft Bond)
- Waxed paper (optional)
- Drill and ribbon to create a hanger (optional; see step 6 for more hanging options)
Instructions:
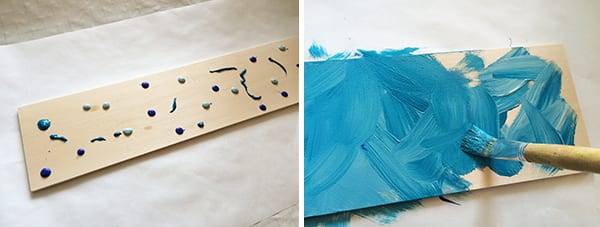
- Place the rectangular piece of wood on a protected work surface and allow your child to paint it as desired. Note: They can use many colors to paint designs or just one for a solid background, but keep in mind that you probably want the wooden letters and clothespins to contrast with the background. One way to help smaller children paint a large area or to get a blended marble look is to squeeze dollops of paint in different shades of the same color all over the wood, then let your child use a large brush to spread the paint and cover the board. This is what we did, using three different shades of blue paint.
- Decide what you would like your wooden letters to spell out; we chose “Georgia’s Art,” but other options might be “Look What I Made!” or “Grandma’s Brag Board.” Whatever you choose, lay the letters out on a protected work surface, along with the 5 clothespins. Let your child paint the letters and tops of the clothespins as desired, keeping in mind that they should contrast with the background if you want them to show up (we used three shades of bright yellow).

- Let the painted board, letters and clothespins dry completely. Note: I recommend placing the wooden letters on a piece of waxed paper and clipping the clothespins onto waxed paper while they dry to prevent everything from sticking!
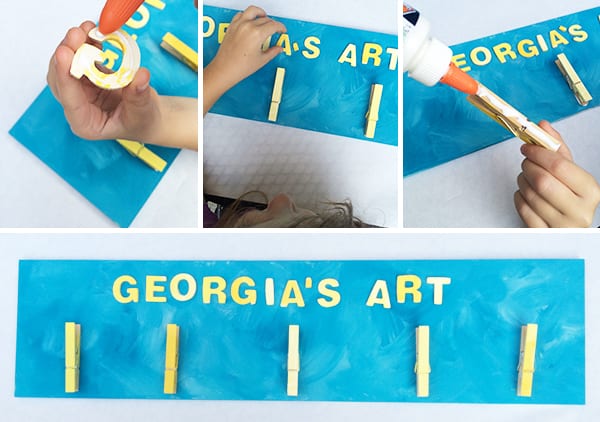
- Arrange the letters across the center top of the board, and evenly place the clothespins along the bottom half of the board so that the closed part faces down. Starting at the beginning of your text and with one letter at a time, work with your child to apply glue to the back of each letter and glue it them in place. Repeat with the clothespins, being generous with the glue for a sturdy bond when dry.
- Allow the glued board to rest in a still, flat place to dry completely, at least overnight.
- Using a drill, carefully drill a hole near the upper left and right corners. String a length of ribbon through the hole and tie off to create a hanger. Don’t feel like dealing with the power tools? No worries! Here are a couple of other options:
- If your piece of wood is lightweight, you can simply glue two ends of a ribbon hanger on the back to the upper left and right corners. I recommend using hot glue or a generous amount of strong white craft glue; just be sure to let it dry completely before use.
- Use one or two sawtooth picture hangers from a picture hanging kit. Again, no need to nail them in place; a generous amount of white glue should do the trick!
- If your board is small enough to fit on the front or side of your refrigerator, you might like to glue several heavy-duty magnets on the back for a cool magnetic brag board.
- To use your new art hanger, simply clip your favorite pieces of art, schoolwork or photographs in the clothespins!
Advertisement