

Crafting with Kids: Fishy Ocean Mobile
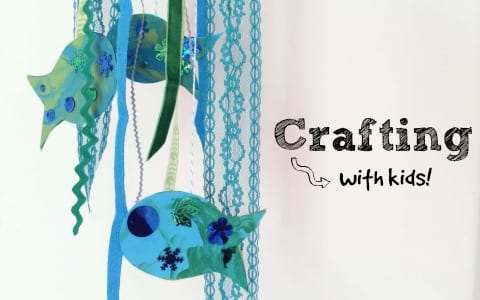
For so many of us, summertime is code for “beach season,” especially since we are lucky enough to live within driving distance to the coast. Between the Gulf, the lake and the pool, our family spends a significant amount of time playing in the water this time of year. Here is a fun, decorative craft project resembling the sparkle of fish scales among seaweed and waves that is sure to bring a little of that underwater magic to your child’s bedroom – and it will last long after the beach towels return to the closet in cooler months!
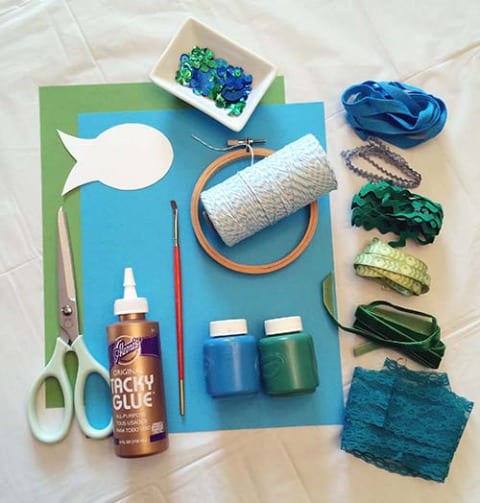
What you need:
- Fish template (click to download)
- Wooden embroidery hoop or metal ring, 5 inches
- One sheet each of green and blue cardstock paper
- Assorted green and blue sequins
- Assorted green and blue trims (such as ribbons, lace or rickrack)
- String or twine
- Green and blue paint
- Paint brush
- White tacky glue
- Marker
- Scissors
- Clothespins or binder clips
How to make it:
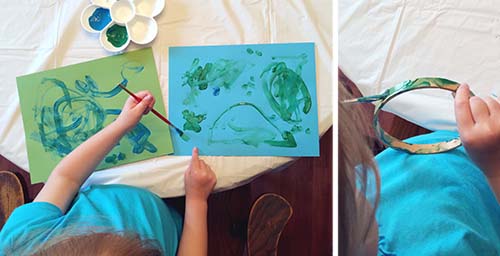
- Provide your child with one sheet each of green and blue cardstock, along with green and blue paint. Let them paint patterns onto the paper as they please, encouraging them to use green paint on the blue paper and vice versa for the most contrast. Let dry.
- Remove inner ring from embroidery hoop; outer ring will not be used for this project. Let your child paint the ring as they please with green and blue paint. Set aside and let dry.
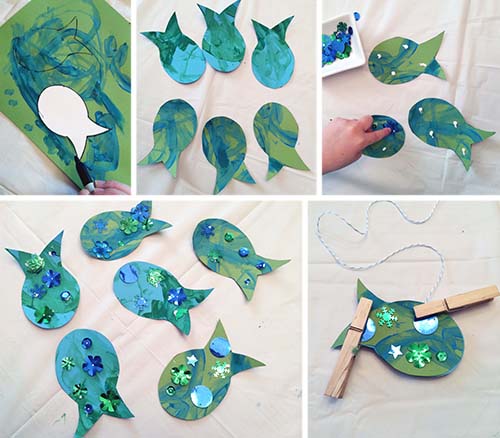
- Print fish template and cut out. Placing fish template on top of various painted areas of child’s paintings, use a marker to trace around fish template three times on each sheet. Cut out fish shapes from painted papers so that you have three of each color (while younger children will need help with this step, older kids can try cutting out the fish on their own).

- Apply dots of tacky white glue randomly across surface of each fish and allow your child to adhere blue and green sequins of their choice onto each dot. Allow fish to dry completely.
- Cut three lengths of string or twine that each measure 12 to 18 inches long. Glue two fish shapes together back-to-back so that one end of twine is sandwiched in between, creating a hanger for the fish. If needed, clamp fish together using clothespins or binder clips until dry.
- Cut three more lengths of string or twine that each measure about 12 inches long. Tie each piece of twine onto painted embroidery hoop at evenly-spaced intervals. Then, grasp the ends of all three strings and tie into a knot at the top to create your mobile’s hanger.
NOTE: Steps 7 and 8 are easier to complete if the mobile is hanging from a hook of some sort! And while older children can likely complete these steps themselves, younger children can still get involved by helping you choose which piece comes next, and where to hang it.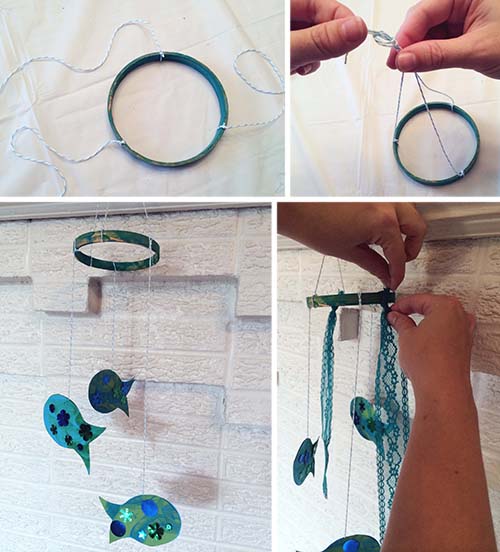
- Work with your child to tie each fish’s string onto the hoop at evenly-spaced intervals, varying the lengths and trimming any excess twine.
- Lastly, tie on assorted lengths of trims, ribbons, lace and/or rickrack around the rest of the hoop.
Advertisement