

Crafting with Kids: Giant Fall Apples
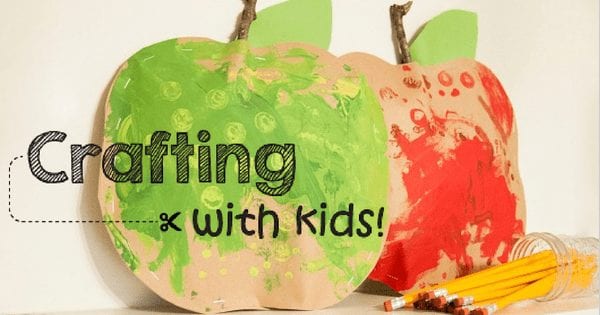
Nothing says “back to school” and welcomes autumn like big red and green apples! This month, my children had a blast playing with non-traditional materials to make these giant 3D painted apples. Using several shades of the same color paint is a great way to allow your little ones to mix and swirl their paints together on their papers without creating a muddled, brown mess.
This fun project also allows kids to experiment with the different marks you can make using everyday items such as the end of a pencil or the flat end of a cork. Hunt around your house or yard for other items you could use to stamp or paint unique shapes and textures, such as leaves, feathers, cut vegetables, hardward findings and more (or better yet, make your own stamps using last month’s Crafting with Kids tutorial.) Happy Fall, y’all!
What you need (for 1 apple)
- Two 12”-square sheets of kraft scrapbook paper (butcher paper or grocery sacks will also work)
- Solid green paper
- Scrap sheet of paper
- Stick, approximately ½”-wide x 6” long
- Three shades each of either red or green paint (dark, medium and light)
- Leftover cork
- Pencil with flat eraser
- Paint brushes
- Scissors
- Tape
- Stapler
- Paper plate or paint tray
- Junk mail, newspaper or tissue paper

How to make it
- Pour a small amount of each paint color onto a plate or paint tray. Using the scrap sheet of paper, show your child how (s)he can experiment with the paintbrush as well as the end of the pencil and cork to “stamp” circles and dots with the paint.

- Tape the corners of one sheet of 12”-square kraft paper onto a protected work surface and allow your child to go crazy with the paint colors and tools. Let them can paint, stamp and layer to their heart’s content! When your child is done painting, set the paper aside to dry completely.

- Pair the painted sheet of paper with the remaining 12” square sheet. Holding them together as one, cut away each corner to round them into an oval shape. Then trim away a slight curve from the top and bottom edges to create an apple-like shape. (Older children can try cutting on their own, but younger children may need some help from Mom or Dad.)
- Cut (or have your child cut) a large almond shape from the solid green paper to create a leaf.
- Turn the painted apple shape over and tape the 6” stick in place so that it extends from the top like a stem.

- Tape the leaf in place in place on the plain apple shape so that it extends from the top at an angle. (Note that the leaf should be taped on the side that will be inside the apple so that the tape is concealed.)
- Place the painted apple front and plain apple back together so that the taped ends of the stick stem and leaf are encased inside and all the edges are aligned. Starting at the top edge and working around the sides, begin stapling the apples together around the edges, leaving about 10 inches open along the bottom edge.
- Have your child crumple up a few sheets of junk mail, newspaper or tissue paper and stuff them inside the apple (we used 3 crumpled sheets of newspaper ads inside each of our apples).
- Align and hold the bottom open edges together and finish stapling your apple shut!

Advertisement